
There’s no better way to indulge in summertime than by sharing a fresh, seasonal fruit platter with friends and family after a meal!
Choose your fruit
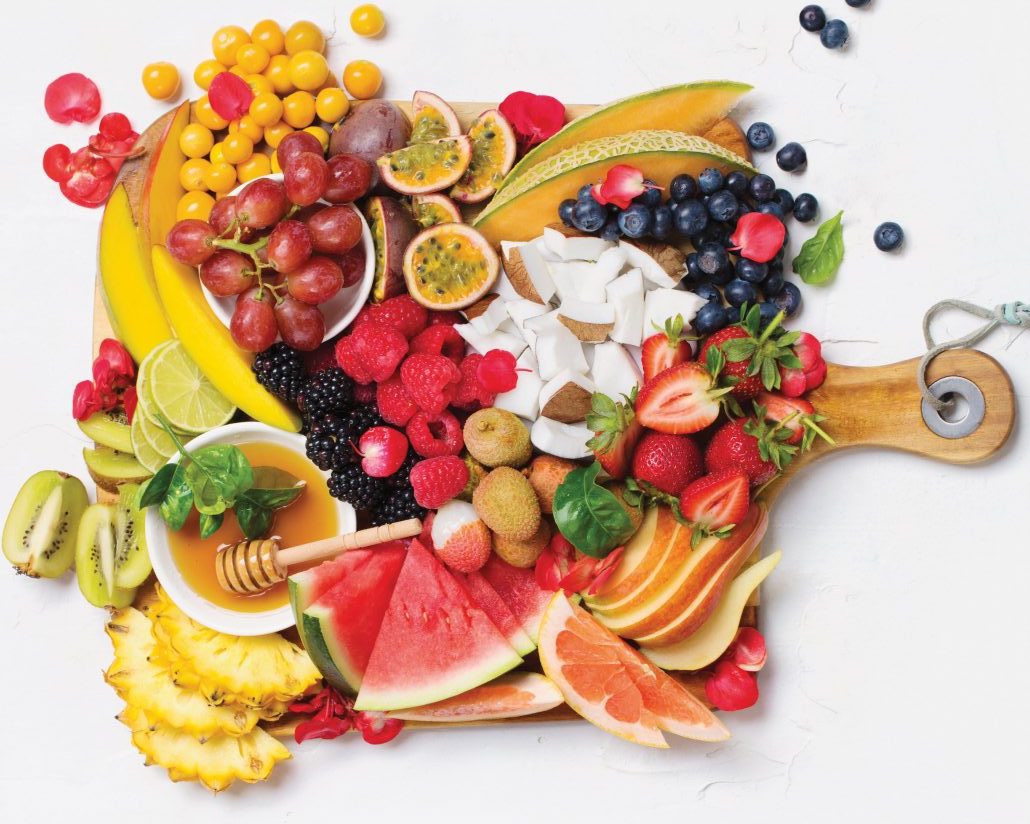
Since the fruit is the star of your platter, it goes without saying that ripe and seasonal fruit is a must. Your basic everyday produce such as pears and grapes are always a good starting point (especially from a budget-friendly point of view). From here, you can use show-stopping options such as melon, berries, coconut and tropical fruit to take things to the next level. To make things easier for yourself, make sure that you’re selecting options that don’t require any prep, peeling or chopping. Choose one or two fruits that you can spend some extra time making beautiful as the focal point of the dish. You might also want to consider choosing a colour scheme so that your platter is not only delicious, but aesthetically pleasing as well. A rainbow spread will always be a hit, but you can go for a monochrome vibe to make a statement. Be sure to choose fruit that is in season. It’s fresher, cheaper and will put less of a strain on our environment.
Chop, chop!
Fruit that is beautifully chopped to perfection is not reserved for experts alone. The simplest way to do this is to experiment with a variety of shapes. Hello cookie cutters! Add your perfectly-pressed shapes to your fruit platter and freeze the offcuts to serve in drinks or to blend up in smoothies. You can have some thin or thick slices as well as wedges, cubes and roughly chopped chunks. Leaving some of the pieces unpeeled allows for extra texture and variety. And if you really want to go full tilt by trying out something extra fancy that you’ve seen on Instagram, a quick Google search for video tutorials will set you on the right path.
To assemble
Opulence and indulgence are two words that come to mind when thinking of a fruit platter worthy of a Mediterranean spread. And you don’t need to buy the whole fruit aisle to achieve an abundant look. Use a platter or dish that is just barely the right size for the fruit that you have bought, filling it until it’s almost overflowing with colourful produce. Place sturdy fruits, such as pineapple, pears and grapes at the bottom. Top with softer fruit such as berries, or arrange these in between the sturdier fruit. Add a little bowl of honey on the side for dipping and you’re good to go!
Stop your fruit from going brown
While a brown slice of apple or pear isn’t going to do anyone any harm, it certainly doesn’t look appealing, especially if you have guests coming over. The simplest way to keep browning at bay is to choose fruit that doesn’t need to be chopped. But for your apples, pears, pineapple and more, lemon juice is your saviour. You can either toss the chopped fruit directly in fresh lemon juice, but if the sourness is too strong, soak your fruit in a solution of lemon juice and water for 5 minutes. Since browning is caused by oxidation, or the exposure to oxygen, make sure your fruit or your platter is either tightly sealed or wrapped up in the fridge until just before serving.
We used
– Gooseberries
– Mango
– Kiwi
– Blueberries
– Blackberries
– Strawberries
– Raspberries
– Pineapple
– Limes
– Watermelon
– Red grapes
– Granadillas
– Litchis
– Coconut
– Spanspek
– Pears
– Grapefruit
Words: Kate Turner | Styling: Chiara Turilli | Photography: K-Leigh Siebritz // HMimages.co.za
Saving this recipe for your next picnic? Don’t forget to include a MyKitchen’s tasty meat and cheese board.